I'm finally ready for the big announcement...Sew Historical now has an Etsy shop! I've just about got all of my portfolio up and ready for custom orders, so pay me a visit, already! :)
http://www.etsy.com/shop/SewHistorical
Abby

Friday, December 14, 2012
Sunday, December 2, 2012
Two of Hearts
For the Texas Renaissance Festival this year, our little family is going to dress up in an "Alice in Wonderland" theme. Mostly because I wanted to make myself a fabulous Renaissance-style Queen of Hearts dress. The hubs will be the Mad Hatter, and my 20-month-old is going to be the 2 of Hearts. I am only part of the way into my own costume, but I have completed my son's playing card costume. It requires some scissors, a little glue, and very little sewing! Here is how I did it:
Supplies for a Toddler-sized costume:
-1 yard of very heavyweight Pellon/interfacing--mine was a little less than a yard (31") because it was a remnant.
-1 square of craft felt in red
-felt glue
-velcro (I prefer sew-on, but I guess you could also use iron-on)
-white thread
-scissors
-sewing machine
-printer
-toddler-sized t-shirt (for measuring purposes)
-scrap cardboard
Press any wrinkles out of your interfacing and cut it in half, creating two rectangles and stack them. Measure the length and width of your rectangle and write down your measurements. To create the "print" on the card face, I found an illustration of the 2 of hearts online and put it in Microsoft Publisher to make it the correct size for the costume.

Open a new document in Publisher and choose 8.5" x 11" portrait size. You will need to resize your page to the measurements that you took and wrote down.


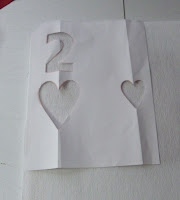 Okay, now you're ready to cut out your lettering. My image also had a rounded corner which I cut on the paper and transferred to the fabric to give a more authentic playing card look. When cutting my hearts and the 2, I did so in a manner that would allow me to use the remaining paper as a template for later placement, like so:
 Fold your felt square in half, pin your shapes to it and cut.
 Take your toddler's t-shirt and place it on top of one of the interfacing rectangles, marking where the sleeve meets the edge of the rectangle. Below the lower mark is where your Velcro will start (where the tape measure is pinned). Above this mark is where you will stitch the shoulder seam.
 Cut your Velcro to length, beginning at the "below-sleeve" mark and ending about 1" - 2" from the bottom (see photo above). Using the zigzag setting on your machine (3rd from left in pic), stitch the Velcro in place along the sides..
 Velcro the front and back sections together and, using a straight stitch, stitch two shoulder seams around the top curve or corners (depending on your style choice) of the rectangle.
 Take some cardboard (I used two box flaps) and place between your front and back pieces, underneath where you want to place your felt design. Using your template from earlier, place on the corner of front piece:
 Apply felt glue to the back of each piece on your design and place in the template. Repeat this step on the opposite (diagonal) corner. Allow to dry for a few hours.

 Voila! Super easy, super quick, super adorable toddler costume!
Supplies for a Toddler-sized costume:
-1 yard of very heavyweight Pellon/interfacing--mine was a little less than a yard (31") because it was a remnant.
-1 square of craft felt in red
-felt glue
-velcro (I prefer sew-on, but I guess you could also use iron-on)
-white thread
-scissors
-sewing machine
-printer
-toddler-sized t-shirt (for measuring purposes)
-scrap cardboard
Press any wrinkles out of your interfacing and cut it in half, creating two rectangles and stack them. Measure the length and width of your rectangle and write down your measurements. To create the "print" on the card face, I found an illustration of the 2 of hearts online and put it in Microsoft Publisher to make it the correct size for the costume.
Open a new document in Publisher and choose 8.5" x 11" portrait size. You will need to resize your page to the measurements that you took and wrote down.
Under the "Page Design" tab, select the drop-down menu under "size" and click "Create New Page Size" toward the bottom of the menu:

Adjust the settings on "width" and "height" to reflect your own measurements.

Insert the picture that you chose and re-size the image to fit your page.

Crop the image in half, top to bottom.

Crop the image in half again, side-to-side, so you only have about a quarter left (this is not an exact measurement, just make sure all of your design is included in this crop). Copy this image to the clipboard.

Open a new 8.5" x 11" document and paste your image from the clipboard into your new document. DO NOT re-size to fit this page. Your pasted image should reflect the measurements from your other document. Print this image.

 Okay, now you're ready to cut out your lettering. My image also had a rounded corner which I cut on the paper and transferred to the fabric to give a more authentic playing card look. When cutting my hearts and the 2, I did so in a manner that would allow me to use the remaining paper as a template for later placement, like so:
  Fold your felt square in half, pin your shapes to it and cut.
 Take your toddler's t-shirt and place it on top of one of the interfacing rectangles, marking where the sleeve meets the edge of the rectangle. Below the lower mark is where your Velcro will start (where the tape measure is pinned). Above this mark is where you will stitch the shoulder seam.
  Cut your Velcro to length, beginning at the "below-sleeve" mark and ending about 1" - 2" from the bottom (see photo above). Using the zigzag setting on your machine (3rd from left in pic), stitch the Velcro in place along the sides..
 Velcro the front and back sections together and, using a straight stitch, stitch two shoulder seams around the top curve or corners (depending on your style choice) of the rectangle.
  Take some cardboard (I used two box flaps) and place between your front and back pieces, underneath where you want to place your felt design. Using your template from earlier, place on the corner of front piece:
 Apply felt glue to the back of each piece on your design and place in the template. Repeat this step on the opposite (diagonal) corner. Allow to dry for a few hours.
 Voila! Super easy, super quick, super adorable toddler costume!
It's a minor miracle that he stood still for that photo! After the first wearing, I cut a shallow neckline into the front piece for more comfort. My son, who is 22 months, did manage to get it dirty in a few places. If you need to wash it, I recommend spot cleaning. Otherwise, if you need to get a bit more thorough, you may wash it in the washing machine on "delicate" and hang it to dry. HOWEVER, the felt glue is a little water-soluble. I did face the issue of losing a couple of felt pieces off the thing, but I was easily able to re-glue them before the next wearing with no problems. The interfacing holds up well in the wash cycle. You can avoid losing the felt shapes by topstitching them on with red thread, but that betrays the "quick and easy" nature of this costume. :)
Sew on, sew until your dreams come true!
Abby
Wednesday, April 25, 2012
King's Robe
I've finally finished the King's Robe and French Hood (in a separate post)...finally. I feel like I've been neglecting my family and friends for months. I wasn't consumed with sewing the entire time, though. There was a lot of time spent waiting and communicating via email and then I was able to finally get started in early March.
While the pattern provided the basic look I was going for, I felt like it was severely lacking in the "panache" department. I used the pieces provided to get the bulk of the garment, but the collar was, well, absent. I felt like it needed just a little jazzing up. I also ran into some problems with the size of the pattern pieces vs. my fabric.
Here is a guide to the departures I made from the pattern and pattern instructions:
 I'll start with the problem I encountered with the size of the pattern vs. the size of my fabric. Admittedly, I still don't know if the problem was with the pattern piece or the fabric. The fabric I used was 54" wide drapery fabric with a one-way design. I am no stranger to using 54" fabrics, but one-way designs are a bit of a rarity for me. Totally worth it, though...it was fabulous and on sale. :)
In my opinion, the sleeve pattern piece was unnecessarily wide at the top, especially for the view that I was making. After folding my fabric in half, I was still short on the top-sleeve width by about 3 inches, so I wasn't even able to fudge it to make it work. Instead, I decided to separate the pattern at the line described as the "placement line" for the over-sleeve piece.

To do this, mark the pattern 1/2" above the placement line and cut along the marked edge
You will cut the top piece from a secondary piece of fabric. This can be in any color, but I would use the same color fabric that you will use for your over-sleeve piece. Since my over-sleeve was of black satin, I used a black cotton bottomweight fabric for this top-half sleeve piece. IMPORTANT: You must add 1/2" along the bottom edge when you cut out the top piece of the sleeve, to make up for the seam allowance you have created a need for by cutting the pattern piece in the middle.
 Taking the "Front" and "Back" pattern pieces from both patterns, lay the coordinating pieces (lowest neckline underneath) on top of on another and place a piece of blank copy paper behind. line up shoulders and "fold" edges, then trace the higher collar outline onto the copy paper.
 Use the Mandarin collar piece from 5214 and cut 2 of your primary fabric. To strengthen a fabric that has little body, again, a piece of lightweight fusible interfacing cut to shape would help you out there. Stitch the 2 collar pieces, right sides together, clip curves and turn right-side-out, pressing seams open. Attach to coat at neck, right sides together, on the outside of coat. On inside of coat, turn bottom edge under and whip stitch bottom edge to inside of coat neckline.

While the pattern provided the basic look I was going for, I felt like it was severely lacking in the "panache" department. I used the pieces provided to get the bulk of the garment, but the collar was, well, absent. I felt like it needed just a little jazzing up. I also ran into some problems with the size of the pattern pieces vs. my fabric.
Here is a guide to the departures I made from the pattern and pattern instructions:

In my opinion, the sleeve pattern piece was unnecessarily wide at the top, especially for the view that I was making. After folding my fabric in half, I was still short on the top-sleeve width by about 3 inches, so I wasn't even able to fudge it to make it work. Instead, I decided to separate the pattern at the line described as the "placement line" for the over-sleeve piece.

To do this, mark the pattern 1/2" above the placement line and cut along the marked edge
You then have 2 pieces of tissue: You will cut the bottom piece from your PRIMARY fabric.
 |
| cut sleeve pattern into 2 pieces |
You will cut the top piece from a secondary piece of fabric. This can be in any color, but I would use the same color fabric that you will use for your over-sleeve piece. Since my over-sleeve was of black satin, I used a black cotton bottomweight fabric for this top-half sleeve piece. IMPORTANT: You must add 1/2" along the bottom edge when you cut out the top piece of the sleeve, to make up for the seam allowance you have created a need for by cutting the pattern piece in the middle.
 |
| 1/2" seam allowance shown at bottom |
Once you have cut your pieces from the appropriate fabrics, attach them, right sides together, to each other along the line you created, using a 1/2" seam allowance.
 |
| Pin right sides together & sew |
 |
| After stitching, press seams open |
That solved the problem of not having enough fabric for the top of the sleeve without having to sacrifice any of the sleeve width at the top and shrinking the armscye. Now, having done it, if I ever need to sew this pattern again, I will probably just slim down the top of the sleeve and adjust the armscye accordingly. I didn't know how it would affect the rest of the sleeve if I did that the first time, so I just came up with this alternative way.
A couple of other things I did differently: I lined the over-sleeve section with lightweight fusible interfacing to give it some body. The satin I used just wanted to hang there, all limp and sad, so adding the interfacing helped it to look a little livelier. Also, due to time and budget constraints, I did not line the inside of the coat as I usually do. It's just as well, though, since it gets so hot here and I already had plans to use real fur trim.
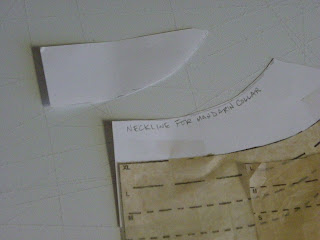
I also wanted to spice up the collar of this coat because it was completely lacking any kind of collar whatsoever and looked rather incomplete and, frankly, cheap. I adapted the mandarin-style collar from McCall's 5214 Men and Boys King Costume, View A.
 Taking the "Front" and "Back" pattern pieces from both patterns, lay the coordinating pieces (lowest neckline underneath) on top of on another and place a piece of blank copy paper behind. line up shoulders and "fold" edges, then trace the higher collar outline onto the copy paper.
Remove the piece with the higher collar (5214), and tape the copy paper to your pattern piece from 5907. Cut along your traced lines.
 Use the Mandarin collar piece from 5214 and cut 2 of your primary fabric. To strengthen a fabric that has little body, again, a piece of lightweight fusible interfacing cut to shape would help you out there. Stitch the 2 collar pieces, right sides together, clip curves and turn right-side-out, pressing seams open. Attach to coat at neck, right sides together, on the outside of coat. On inside of coat, turn bottom edge under and whip stitch bottom edge to inside of coat neckline.
So, here is the finished product! The customer gave me a rabbit-fur coat purchased at a thrift store to use as trim instead of the prefabricated synthetic fur you can buy at the fabric store. It looked fantastic, but let me tell you, if you haven't worked with cutting fur before (real or fake), it is a MESS. Probably the equivalent of a dozen shedding Siberian Husky dogs (I just have the one, and that is bad enough). I had to open up the garage and cut it outside. The result is lovely, though. Worth the effort in the end.
Abby
Thursday, March 15, 2012
King's Robe and Tudor French Hood Commission
 |
| Wax museum figure of Anne Boleyn |
I am a crazy fan of Tudor fashion (ca. 1485 - 1603), up to and including
Elizabethan. I am mainly fascinated, though, by the clothing of the
wives of Henry VIII. For my costume history final project in college, I
did a thesis on the distinct styles of each woman and how their fashion
choices reflected each lady's personality and spirit. Among the staples of the mid-to-late Tudor lady's wardrobe was the French hood, a style of head wear that was popularized at court by the infamous and ill-fated Anne Boleyn. The style remained in vogue even long after the tragic queen fell from the favor of the king and his court. It was worn by her successors Katherine Howard and Katherine Parr, Princess Mary, and even a young Princess Elizabeth (her daughter).
 |
| photo courtesy of Houston Arts Week |
I used the guidance of the fabulous book, The Tudor Tailor in drafting the pattern for and constructing the French hood. My intention for this next round is to actually make two, one for Rose and another to sell. I was able to score an amazing deal on beads at Joann, including glass pearls and faceted glass to embellish the hood with. In addition to the part that sits atop the head, there is a veil and a "bag" for the hair. I usually use a snood for this part (a hair net-type of thing) and stitch it onto the back. Unfortunately, that was a luxury that Performing Arts Supply allowed me, and I don't have access to those at this point.
 For the King's robe, I am using the now out-of-print McCall's 5907. It's a fairly simple looking garment, so it shouldn't take much time. Rose gave me a rabbit-fur coat that she bought at a thrift shop to use as the trim. It is off-white with brown dots, so it looks kind of like ermine. I'll probably deconstruct it and hand-sew it to the front and cuffs. I found a great looking deep red home decor fabric at Jo Ann for $9/yard to use for the coat body, so, score!, I was able to get just about all of the materials for under $100! Yay! That means that I get to keep the rest.
I will also make him a simple pair of knee breeches with elastic at the waist and legs.
I will be posting details on the construction of the French hood after that gets underway, so stay tuned!
Abby
Subscribe to:
Posts (Atom)