Thursday, March 15, 2012

King's Robe and Tudor French Hood Commission


Wax museum figure of Anne Boleyn
I am a crazy fan of Tudor fashion (ca. 1485 - 1603), up to and including Elizabethan.  I am mainly fascinated, though, by the clothing of the wives of Henry VIII.  For my costume history final project in college, I did a thesis on the distinct styles of each woman and how their fashion choices reflected each lady's personality and spirit. Among the staples of the mid-to-late Tudor lady's wardrobe was the French hood, a style of head wear that was popularized at court by the infamous and ill-fated Anne Boleyn.  The style remained in vogue even long after the tragic queen fell from the favor of the king and his court.  It was worn by her successors Katherine Howard and Katherine Parr, Princess Mary, and even a young Princess Elizabeth (her daughter).

I have been asked by a nice lady named Rose to create a King's robe for her husband and a Tudor lady's French hood for herself.  They are college masters at Rice University and have an annual celebration that they reside over as King and Queen.

photo courtesy of Houston Arts Week
I am incredibly excited to create another French hood.  I have made two for Performing Arts Supply in the past and they rent the heck out of them for Texas Ren Fest and Opera in the Heights.  Dena at PASCO recently costumed a performance of Bolena for OIH and the shop ended up making several new Tudor gowns, English gable hoods and French hoods, much to my delight!  (That's them in the pic!) Squeee!

I used the guidance of the fabulous book, The Tudor Tailor in drafting the pattern for and constructing the French hood.  My intention for this next round is to actually make two, one for Rose and another to sell.  I was able to score an amazing deal on beads at Joann, including glass pearls and faceted glass to embellish the hood with.  In addition to the part that sits atop the head, there is a veil and a "bag" for the hair.  I usually use a snood for this part (a hair net-type of thing) and stitch it onto the back.  Unfortunately, that was a luxury that Performing Arts Supply allowed me, and I don't have access to those at this point.

For the King's robe, I am using the now out-of-print McCall's 5907.  It's a fairly simple looking garment, so it shouldn't take much time.  Rose gave me a rabbit-fur coat that she bought at a thrift shop to use as the trim.  It is off-white with brown dots, so it looks kind of like ermine.  I'll probably deconstruct it and hand-sew it to the front and cuffs.  I found a great looking deep red home decor fabric at Jo Ann for $9/yard to use for the coat body, so, score!, I was able to get just about all of the materials for under $100!  Yay!  That means that I get to keep the rest.

I will also make him a simple pair of knee breeches with elastic at the waist and legs.


I will be posting details on the construction of the French hood after that gets underway, so stay tuned!

Abby

Sunday, February 19, 2012

...So Where Was I?

Oh, yeah, RenFest.

So this costume turned out to be ADORABLE.  We got so many comments at the fair, not to mention from our many Facebook friends after I plastered my page with photos.  We definitely took lots of pics in costume, however, I was so pressed for time while making it that I didn't really take photos of the process.  The good news is that I pretty much used the straight pattern pieces with little or no departure from the instructions.

Here is pretty much how it went down:  I used the straight pattern of Simplicity 2788 for the baby costume, using white cotton muslin for the body suit and headpiece, black velveteen for the outside ears, cuffs, and booties, and a peach satin for the inside of the ears.

For the Bo Peep costume, I really didn't have to do much of a "Franken-pattern."  I was able to use most of Simplicity 5582, a Renaissance-style dress with a lot of different pieces.  I used the bodice without tabs at the waist and the long-gathered-sleeved blouse pattern, cutting the sleeve just below the first elastic channel.  The blouse is made of cotton muslin that was dyed an olive green to match the drawing.


 Simplicity 5582


For the skirt, I just clipped about 10 inches from a yardage of 45" fabric, added some double lace at the hem, and gathered the top into a waistband.  For the panniers, I used the panniers from Simplicity 3723, view C.  The skirt on 3723 is a very basic skirt, so I just followed the instructions for that pattern on how to attach them.  I shopped long and hard to find the fabrics for the skirt, and finally found them in the quilters cotton section of Jo-Ann.
I borrowed a child's hoopskirt, the shepherd's crook, and the lady's colonial straw hat from the world's greatest costume shop, Performing Arts Supply. I didn't use a petticoat, though I wish that I had.  I like the rounder shape of the skirt in the illustration more than the conical shape of the hoop that I'm wearing.  I believe the panniers would have looked better too.

Here's a photo of the three of us.  Dad was dressed as The Big Bad Wolf (he's such a good sport)!

Oh, and PS, I believe I will be selling this costume (Bo Peep and sheep only, no wolf!) as the first item in my Etsy Shop.

Abby

Monday, October 3, 2011

Baby's first RenFest

I had the CUTEST idea for a mom & baby costume for James' first Halloween!  I'm sure that I'm not the first person to think of it, but I really want to do a Little Bo Peep and sheep costume.  If I had time (which I don't), dad would dress up as a wolf, but that will have to be another day.  We probably won't be doing anything cool for Halloween (weekend) proper, but we are going to be going to the Texas Renaissance Festival the weekend before with my in-laws, so I figured that's as good of an excuse as any to get dressed up.

I am going to use Simplicity 2788 for the lamb costume (since I have never done a baby/child costume, I will be using the full pattern and doing a complete review on patternreview.com).  I am at a loss for what fabric to use.  I'm afraid anything but single-layer cotton will be too hot, but the woolly looking fabric is so cute.  I think that I will probably end up doing plain cotton muslin lined with the same.  I'm not sure if the head piece is attached or not, but I would probably not attach it anyway in case it happens to be 100 degrees that late October day.  You never know.


For the Bo Peep costume, there are no extant patterns that are not "slutty Bo Peep," which I am not the least bit interested in.  Nobody wants all this hanging out, least of all me, so I'm going to have to get creative.  I just wanted a cute, authentic-looking costume, so I went to the story books.  I found this adorable illustration and the thing I love about it is that it's not PINK.  Although I have no qualms about wearing pink, I think that pink is overused.  I love this one!  I will have to do some dyeing to get the colors right, but I think I can achieve it.


I went through my pattern stash and found several costumes that I can pick apart and put back together to closely resemble this picture.

Let's review the candidates:
For the blouse: Simplicity 3809, View A.  Leaving off the portion of the sleeve below the first elastic channel, I should be able to achieve the cute short sleeved blouse.
 For the bodice:  Simplicity 3623.  The bodice on this pattern has a point in the front which the illustration does not, but I don't think I'll be changing that.  The difference is negligible.  I doubt that this pattern requires any boning for the vest.  Even so, I will definitely be adding 2 pieces of boning inside the grommets to prevent any wrinkling when it's laced up.
For the drape:  Simplicity 3723, View C.  I will use only the drapes from this pattern (maybe even cut them down a little) to get the blue pieces in the drawing.

I probably won't use a pattern for the skirt (if available).  I'll just cut a length of full-width fabric and gather it at the waist.  I'd also like to use a cute ruffly cotton petticoat, or maybe a hoop skirt, but I'll probably borrow that and a hat from the costume shop where I work (lucky me!).

I really hope I can get this done in the next 2 weeks.  I've got a lot on my plate right now, but I really want to do this!

Abby

Thursday, September 29, 2011

Fantasy Renaissance Madrigal Dress

I have completed Jenna's Renaissance Fair Madrigal dress!  Unfortunately, she will not need a Dickens-era dress, so that will have to be another day.  Here is a breakdown of the process and the modifications that I made to the pattern. *This is not a how-to, but simply a guide the the departures I made from the pattern instructions*

Simplicity Pattern #4940
To begin, I created a muslin mock-up of the dress that would eventually function as the lining:

I don't normally do this since I like to flat-line everything, but Jenna is so very petite that I was willing to put in a little extra elbow grease so I wouldn't have to cut anything twice.  I also didn't want to waste any of the beautiful red silk that I was using!

I then had her come in and do a fitting of the lining which I marked to her figure.  Post-fitting, I disassembled the lining and cut it to the marks, using the lining pieces as a pattern for the dress fabric pieces.


I flat-lined the madrigal dress fabric with the muslin by serging the pieces together and then assembling them.  I only flat-lined the main dress and the upper sleeves.  This provides durability where it is needed and absorbs sweat.

< This shows the inside of the flat-lined dress body with seams pressed open (always press your seams!).


< Silk & muslin serged together and assembled.


As I was cutting the muslin lining, I decided to add a train to the back of this dress that was not featured on the pattern.  This was my first time drafting a pattern piece freehand, so don't judge!  I think my parabola/curve on the top side is too narrow (left) and that the sides of the curve are too deep.  I think it needs to be more of a "waning crescent"  with less of a curve.  You can see from the picture on the right that there are 2 "ruffles" at the very back.  These don't show up terribly when the dress is right side out and the drag of the dress hides it pretty well.  Where the center back seam of the dress meets the train is where I installed the aforementioned wrist loop (previous post).  Wearing the wrist loop will greatly reduce the chance of losing the back of the skirt due to being stepped on. :D

I found some embroidered gold silk taffeta in my stash that I had used on a madrigal dress a couple of years ago (no connection) and thought that it would be a much richer complement to the merlot color of the dress than the cream silk contrast we had originally discussed.  After a quick text to Jenna and her mom, we went with the gold.

I assembled the sleeves according to the pattern instructions, doing a regular lining style on the drape.  The sleeve drape has a drawstring tie that can be drawn up to create a ruched look.  I threaded the cord through the drawstring channels before sewing the drape to the upper sleeve (therefore catching it in the seam) so that there would be no chance of losing the cord (in dry cleaning, etc).  It also helps to be able to draw the cord up really tight.

I just noticed that the ironing board legs behind the dressform make it look like some kind of wonky 3-legged mannequin. >

< Here is one of the only pics I took of the put-together dress before I put the trim on.  You can see the ruffly bits on the train don't really make it look unusual.
I have gotten into the habit of waiting to set the sleeves in a garment until I've finished the details on the neckline and sleeves.  This is especially true if the sleeves have a lot going on.  Trying to machine-sew trim onto a sleeve with a whole dress in your way--and vice-versa with trying to sew a dress with sleeves flopping everywhere--is pretty frustrating.  I have yet to find where this has proven to be a problem.  In my experience, sleeve details and body details are generally able to be separated.

If you have a hard time visualizing things without a picture like I do, then you may also feel like the collar on this thing was kind of a beast, according to the instructions. I have to turn on a part of my brain that reads the instructions one step at a time and doesn't try to put  things together my way.  Otherwise, I will skim the instructions and put the pattern together like puzzle pieces.  That is how I usually do it.

The collar is the same gold taffeta as the sleeve lining, with a sparkly net overlay.  When I made costumes for Performing Arts Supply, a rule we had in designing garments was that "if you have trim in one place, you need it in 3," meaning that you can't just have a color or type of trim hanging out by itself or in pairs.  Good and visually pleasing design is based in a golden rule of odd numbers.  That's not to say that this "rule" wasn't intentionally neglected from time to time, because sometimes, it just looks good the other way. :)


The collar and overlay are sewn together and a trim added to the bottom to disguise the ugly seam.  The trim I used is a 1/4" sheer organza ribbon with satin border applied with 3 rows of topstitching using Sulky metallic gold topstitching thread.  Sulky is the only brand of metallic thread I will use in a machine.  Every other brand I have ever tried breaks repeatedly and frequently.  Argh.


I added the facing to the collar, pressed it under, and hand-tacked it to the lining inside. 


< Cute shoulder bows!  I tacked these in the middle under the "knot" part of the bow and under the top "loops" to hide the thread.


The last modification I made to this dress was to add grommets to the back of the dress instead of a zipper.  I created the modesty panel that goes behind the laces to match the dress.


I created a lined piece 8" wide and 17" long--2 inches longer than the length of the grommeted opening >


 I added matching trim to the top so that it would continue the neck trim all the way around.  I hand-tacked the panel to the lining on the back left side of the dress, making sure that you could see it through the grommet holes on that side.


I used 20 gold grommets with a grommet-setting kit for the back. These grommets are spaced 1 1/2" apart.  I think it's a nice spacing, not too close, not too far:
I always use Fray Check on my grommet holes before setting them to avoid nasty frays and the loss of grommets...if the holes get bigger, the grommets will fall out!

In the middle of the whole process, I thought it would be nice to make a headpiece and a purse to complete the ensemble.  I made an autumn-leaf hair wreath and a small drawstring bag that hangs inside the sleeve:


I simply attached a ribbon loop to the seam where the upper and lower sleeve are joined and threaded the drawstring through the loop.

I thought it would be nice to make the purse out of the same fabric as the sleeve lining so that it would blend in (it's also reversible to the red silk used on the dress).  I used this tutorial on YouTube to make the purse.  I used a 16" circle of fabric because I didn't need it to also function as a hat (if you watch the video, you'll get that).  It will suffice to hold a cell phone and a wallet or coin purse, maybe some chapstick, too.

And, long story short, a little of this, a little of that, badabing, badaboom, Madrigal Dress!


You can check out all of the finished product photos under the Portfolio tab, including a close-up of the purse hiding in the sleeve (you can't really see it in this picture, but it's there!).
Abby

Thursday, August 18, 2011

A New Project!

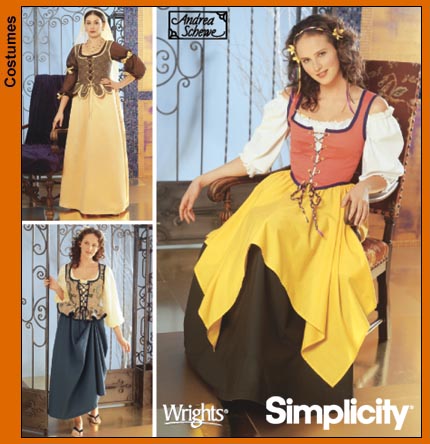
My next project is for a lovely young lady named Jenna.  Jenna will be singing in her school's Madrigal Choir for the next 4 years and needs a dress to wear to the Texas Renaissance Festival on November 10th and another dress to wear to the Dickens on the Strand festival in Galveston the first weekend in December.  I had a meeting with she and her mom yesterday to get a feel for what she liked and she chose the gorgeous Simplicity Pattern #4940:
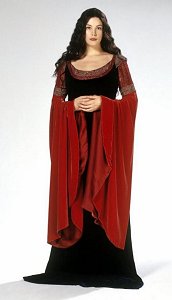
This pattern is a design by Andrea Schewe to imitate the gowns worn by the Elvish maiden Arwen (Liv Tyler) and Eowyn the Shieldmaiden in the Lord of the Rings films.  The end product that Jenna chose will be similar to this gown from "Return of the King":


Jenna's dress will have the sleeves pictured on the light green gown above.  The Renaissance Faire in Texas is usually very hot up until about late November (and the way it's been going this year, who knows how long until Fall...January maybe??), so she chose a dark red drapery silk for the gown and sleeves, a cream drapery silk for the sleeve lining, and gold trim for the neckline, shoulders and sleeves.  It will be fully flat-lined with cotton muslin to protect the underside of the silk skirt from the dust and mud of the Renfest, and protect the inside of the silk bodice area from sweat.  I will give her a wrist loop on the inside of the back of the skirt so that she can carry her skirt and prevent any unfortunate tears from folks stepping on the back of her gown!

This is going to be an enjoyable project...I have not made any replica gowns yet, and I am interested to see how this particular gown will look in silk.  I'll have to check Pattern Review for any pitfalls associated with this pattern.   Come back soon to see pictures of the progress!